Releasing the Clubhead

This story is for you if…
• You want more distance and accuracy
• You often miss your target to the right
• You don’t understand what “release” means
  1. Erika Larkin

    Photo By J. D. Cuban/Golf Digest

    BY ERIKA LARKIN

    It’s no big mystery why you’re slicing your driver. The clubface is open to your swing path at impact. And that slice can get worse if you pull in your arms on the downswing to try to steer the ball into the fairway. Here’s my easy fix: Remember to roll and reach as you swing through. Let your forearms roll over to square the clubface and then reach your arms toward the target.

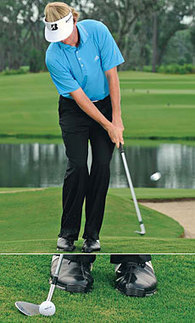
    You can get a feel for this full release by hitting some “bunt” shots with your driver. Tee up a ball and take your driver back until the shaft is parallel to the ground and the toe of the club points straight up (see photo). From there, focus on extending the shaft toward the target so it mirrors that halfway-back position, with the toe up again. Bunt some balls down the range, and don’t worry about distance.


     The Standard Advice

    Try to square the clubface at impact for straighter and more accurate shots.

    Why it’s Misleading

    Impact lasts only a few milliseconds, so trying to perfect that moment is nearly impossible.

    The Tip You Really Need

    A solid release guarantees proper clubface rotation through impact, so perfect it instead. Plus, it’s easier to control your release. As you drive through the hitting zone, give the ball a slap with your right hand, changing your right wrist from bent back to bowed. Check the positions at left to see what it looks like.

     Elbow In

    Your left elbow should hang tight against your torso as your hands release. You can’t unhinge your wrists if your left arm bows out (no chicken-winging).

     Shoulder Under

    Your right shoulder moves under your chin, not in front of it. This allows your hands to power the clubhead correctly through impact and then around your body.

     KEY MOVE – Active Wrists

    Prior to impact your right wrist was bent. Now it should be bowed. This doesn’t happen by itself—”slap” the ball with your right hand to release the club properly.

     Club on Line

    A proper release whips the clubhead around your body in a circular motion and into your finish.


My Favorite Shots To Save Par

See on Scoop.itgolf instruction

Brandt Snedeker shares his favorite shots around the green. (RT @GolfDigestMag: One of Brandt Snedeker’s favorite shots around the green? The hands-free lob.

BestGolfeBooks‘s insight:

The "Hands free lob" is an adaptation to the pitching swing and is a great tool in and around the green.  The firmness in the hands provides a high degree of consistency.

See on www.golfdigest.com

How to Start the Golf Swing

By Kevin Cotter, PGA

The takeaway or start of the golf swing begins with combined movement of the clubhead, hands, arms and shoulders.

This movement, commonly referred to as the “one-piece takeaway” is quickly followed by the hips as they begin to turn in response to the shoulders.  As the hips rotate the lower body (knees and feet) become active as the weight begins to transfer back onto and eventually around the right leg.

Soon after the “once piece takeaway” begins, allow your right elbow to fold somewhat against your right side, at least in the early stages of the backswing.  This allows the arms to remain connected to the body.

The “one piece takeaway” sets the timing of the swing into immediate sync.  The desired sequence of movement is; clubhead, hands, shoulders, hips and lower body in that order.   This backswing sequencing establishes proper coiling of the upper body against the lower body, providing a power generating spring like action to be unleashed during the downswing. Correct timing also helps establish a square clubface position at the top of the swing.

In addition to timing, the proper takeaway is crucial in developing power through angular momentum or also known as the “lever system.”  Proper use of the “lever system” not only unleashes tremedous power but helps establish a ball first then turf strike when playing shots directly off the turf.  Learning to strike the ball with a descending blow is vital, a downward strike to a ball sitting on the turf provides the much needed spin necessary for the ball to stick and hold in the intended target area.

Also, the path of the club is hugely influenced by the natural flow of the “one-piece takeaway.” When not contrived in any way the club moves straight back then slightly to the inside around then up. Eventually, the club returns somewhat along the same path on the way down, creating a semi-circle pattern starting from behind the ball through the ball and into the through swing.

If the club is forced quickly to the outside during the initial stages of the backswing an out to in swing path is likely to be created. Conversely, if you force the club back too quickly to the inside,  the club eventually has nowhere to go but to be forced to the outside and then back across the ball resulting in pulled or sliced shots.

So, as you can now clearly see, the “one piece takeaway” is the crucial first step in developing a powerful repeating golf swing, and provides the ability to consistently strike the ball cleanly and squarely,  leading to longer and straighter shots.

For the best golf training and instructional aids on the web please go tohttp://www.BestGolfeBooks.com your golf eBook superstore andhttp://www.EasytoLearnGolf.com blog for more great stuff to improve your game. Lower scores are just a click away!

Happy golfing!

Article Source: http://EzineArticles.com/?expert=Kevin_R._Cotter

Top Three Golf Swing Set-Up Tips

Stance

The stance is the foundation of the golf swing and like many other sports requires the player to prepare for athletic action. Begin by evenly dividing your weight between both feet, slightly favoring the balls of the feet not the toes or heels. Next, position the feet approximately shoulder width apart. Proper stance width helps maintain good balance, too narrow a stance increases instability and too wide restricts hip and shoulder turn, making it difficult for the player to properly transfer weight back onto and over the right leg during the backswing.

Turn the left foot (forward foot) outward toward the target about a quarter turn. This position allows the player to maintain dynamic balance throughout the golf swing and well into the finish. The back foot (right foot) should generally be pointed straight forward or at a right angle to the target line. This position allows power-generating resistance to build by stabilizing the right leg while the upper body turns around it.

Alignment/Aim

Aligning or aiming the body properly is crucial if one desires to develop a powerful repeating golf swing. The first key point of alignment is; align the leading edge of the
clubface square or at a right angle to the target line. Then set the tips of the toes, knees, hips, shoulders and eyes parallel to that same line. This method of alignment is
referred to as aiming “parallel left.” If a player is to err or deviate from this common principle it would typically involve the feet and body aiming slightly to the left of the
target. Keep in mind though, whatever combination of body and clubface positions a player employs is deemed acceptable if it results in the clubhead consistently traveling down the target line with the clubface square to that line.

Golf is a target game and it is very easy to get caught up in the complexity of the perfect golf swing. However, many who follow this quest fail to recognize that no matter how beautiful the swing becomes it is of little value if aimed incorrectly

Posture

Another key element to develop a powerful repeating golf swing requires the upper body to be tilted over the ball slightly at address. This is achieved by bending from the hips over the ball, not the waist. Bending from the hips allows the spine to remain straight and the buttocks to protrude slightly, whereas if we tilt from the waist the spine tends to curve. The head should also match the plane of the back; this allows the left shoulder to turn underneath the chin during the backswing. This very much helps maintain centeredness while completing the backswing.

Article Source: http://EzineArticles.com/?expert=Kevin_R._Cotter

Article Source: http://EzineArticles.com/7100068

Four Keys to Developing a Championship Golf Grip

Developing a championship golf grip is essential to consistently deliver the clubface squarely to the ball. As the great Arnold Palmer once said “The grip is the crucial junction point from which all the body’s strength and rhythm are transmitted to the club.”

The golf grip is considered a pre-swing principle and carries with it a wide range of personal preferences from which to choose, but there are four keys or common denominators to a championship golf grip that all great players apply.

1. Positioning

“Positioning” refers to the rotational location of the hands on the club. The proper position is best achieved by first allowing your arms to hang somewhat naturally while grasping the club, resulting in a position where the palms of each hand oppose one another or are rotated slightly inward. This resembles the look of praying upside-down. If the hands shift too far to the right or clockwise on the club it would be considered a “strong grip” (closed-face-grip) which encourages a hook, if rotated to far to the left or counterclockwise the opposite would apply or “weak grip” (open-face-grip) which encourages a slice. A desirable position would be one where the upside down V formed between the thumb and forefinger of the left hand (upper hand) points to your chin or right cheek, and the V formed by the lower hand pointing slightly more towards the right shoulder. The opposite would apply for the left-handed player

2. Placement

The upper hand should be placed consistently about 1/2 to 1 inch down the grip from the top or upper end of the club. Position the thumb of the left hand slightly right of center on top of the club; place the thumb of the lower hand on the forward side of the club touching both the club and the tip of the index finger. Also, grip the club in the fingers of both hands as much as possible as grasping the club into the palm rather than the fingers tends to limit joint wrist flexibility.

3. Grip Pressure

Grip pressure should be a 2 or 3 on a scale from 1-5 with 5 being the tightest you could possibly hold the club, or light enough to encourage maximum clubhead speed without losing directional control, and still hold onto the club. Gripping the club too tightly retards clubface rotation as well as prevents the hands/wrists from hinging properly, destroying power generating leverage.

4. Grip Options

There are three grip options from which to choose. The most common grip is the overlapping grip or Vardon grip named after Harry Vardon, where the little finger of the right hand (lower hand) is overtop and in-between the first two fingers of the left hand. The second option is the interlocking grip where he little finger of the right hand is intertwined with the index finger of the left hand. This adjoining or melding together of the hands with both the Vardon and overlapping grip help unify the hands and aids in preventing one hand overpowering the other resulting in increased distance and consistency. The third option or the ten-finger grip sometimes called a baseball grip is only recommended for very young or physically weak individuals who do not possess adequate strength to otherwise hold and swing the club.

Lowering your scores is just a click away! The best instruction available is at your fingertips! Go to http://www.KRCotter.com and begin to achieve your potential now! Impress your friends and begin to eliminate those embarrassing shots today!

Article Source: http://EzineArticles.com/7085976